-
![LANG-CODE-KEY]() LANG_NAME_KEY
LANG_NAME_KEY
After part I, where we looked at how the radar helps you with better visibility, field of view and enemy orientation, today we continue our lesson with more insights on this helpful HUD element. Let's dive right in!
Looking at the radar, you can easily see how high or low a plane is in comparison to your own altitude. On the minimap, all planes are depicted as arrows of the same size. On the radar, however, the size varies if a plane is above or below you: the smaller the arrow, the higher the plane is above you. The bigger the arrow, the further below it is. When the enemy arrow is about the same size as your own, it means you're both at the same height, give or take.
Knowing the enemy's altitude is crucial, especially in dogfights. When the minimap suggests that you're right in front of an enemy but you can't see him, it's likely due to the fact that he is miles above or below you. So even though you seem close on a 2D plane (that's geometric plane), you can actually be worlds apart in the third dimension: altitude.
| Click to enlarge! | ||||
 |
 |
 |
||
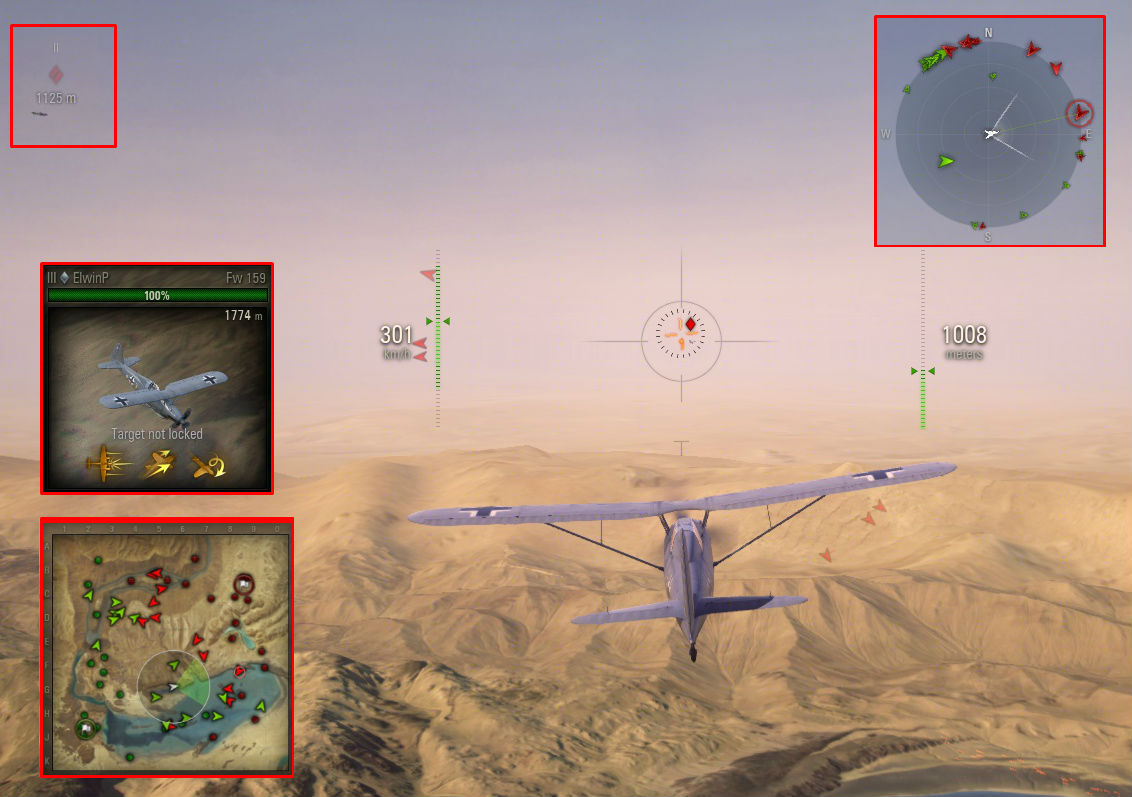
| In this example, the minimap suggests that you're right next to an enemy. Looking at the radar though, you can easily see that this enemy is not at all on your level and is actually way above you (red arrow smaller than your own). It seems to be cruising above the entire group of planes, who might all have trouble getting up to the same altitude if the opponent is already climbing. |
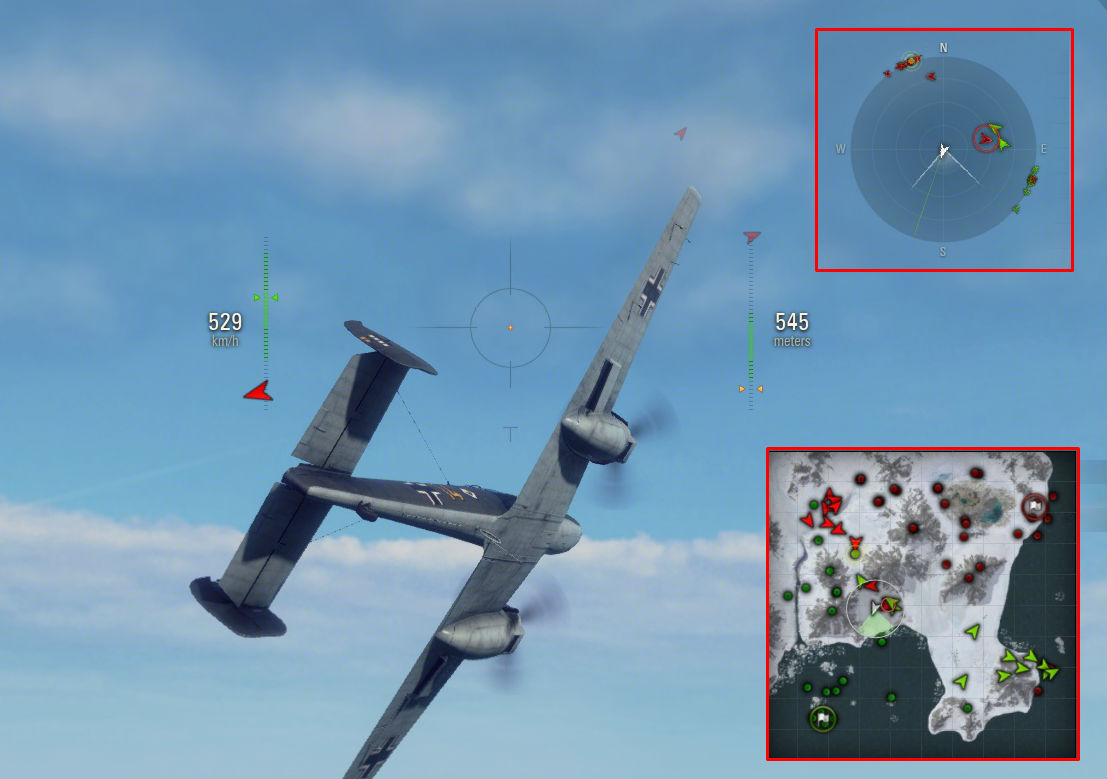
Here is the inverse situation: while you can't see anybody in your current field of view, you can learn from the radar that your locked target is actually below you. You should begin a dive immediately to be able to intercept it, since you also can see from the orientation of the arrow that your enemy is coming towards you. |
Lastly, you can also use the altitude indicators in the radar in relation to your own team members. How so? For example, by avoiding crashing into one of them when maneuvering at the start of each battle. While in this picture, it seems like a teammate is about to ram into you from the side, from the radar you can tell that you're safe – because your teammate is actually quite high above you (smaller arrow). |
||
Using the radar, you can also immediately judge your distance from all of the planes around you. In fact, the radius of the radar is exactly 1km. By looking at how far a plane is from the centre of the radar, you can immediately deduce its distance from you. This is especially helpful if you have lots of planes in your immediate vicinity. It's true that the game does give you information on the distance of all the planes within your view range that are in your field of view. However, using the radar, you can also easily estimate how far away planes are that you're not currently looking at. Needless to say, this is vital information if you want to quickly assess the entirety of your battle situation.
| Click to enlarge! | ||||
 |
 |
 |
||
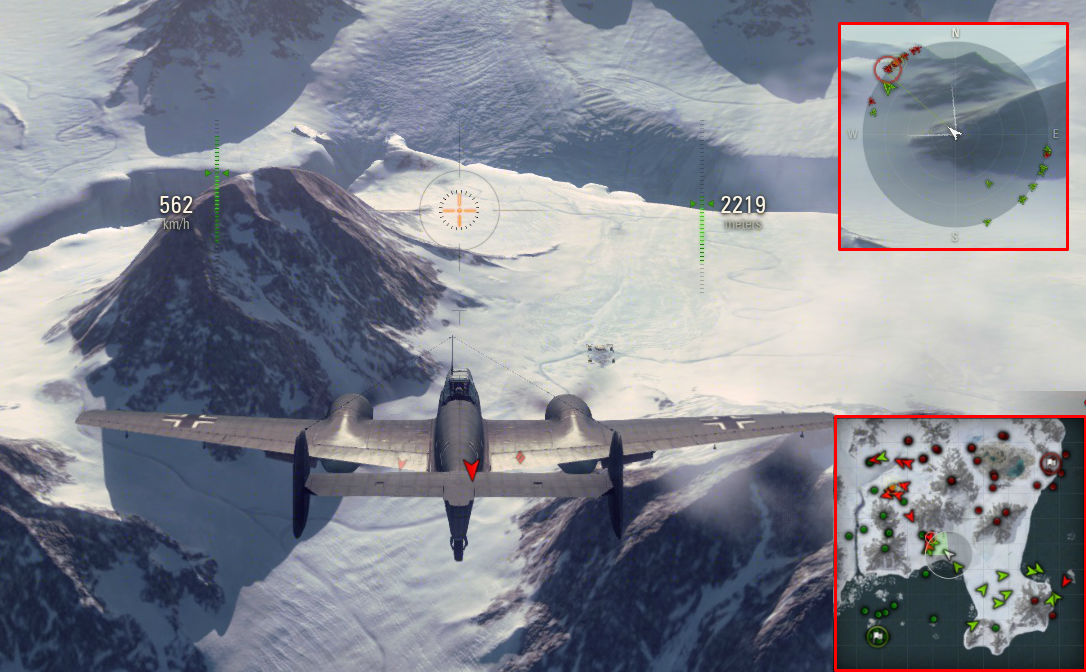
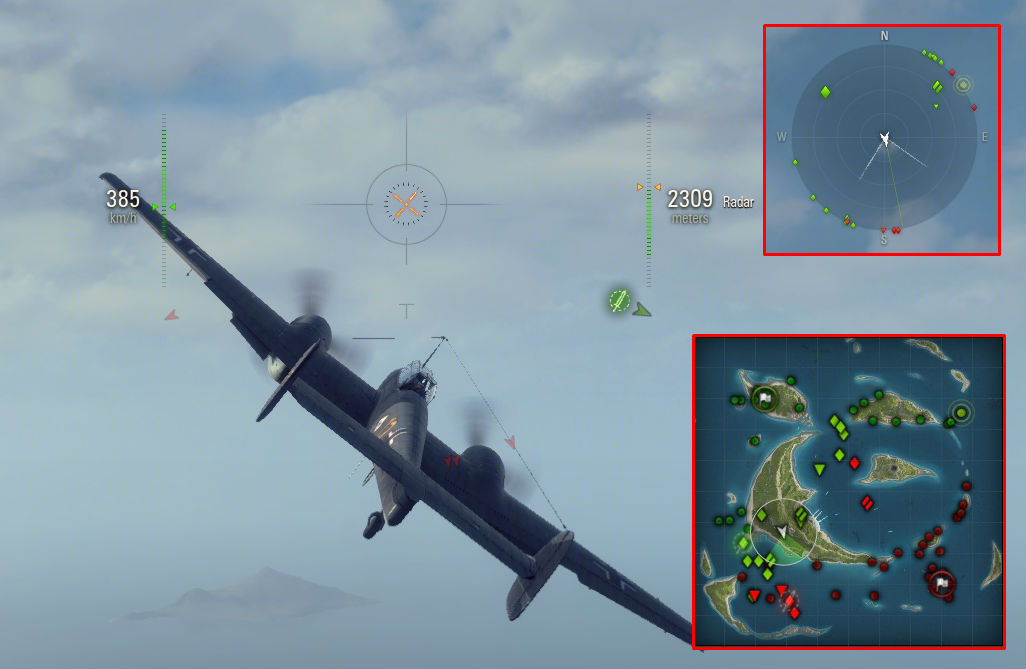
| By looking at the minimap, radar and locked-target window at the same time, you can fully understand your current position. Your locked target is still almost two radar lengths away, two enemies are closing in from the left at around 1km, you've got two buddies in your vicinity (one at your altitude, one high above you), and you're at least 1.5km away from the two major collision points both north and east of you. |
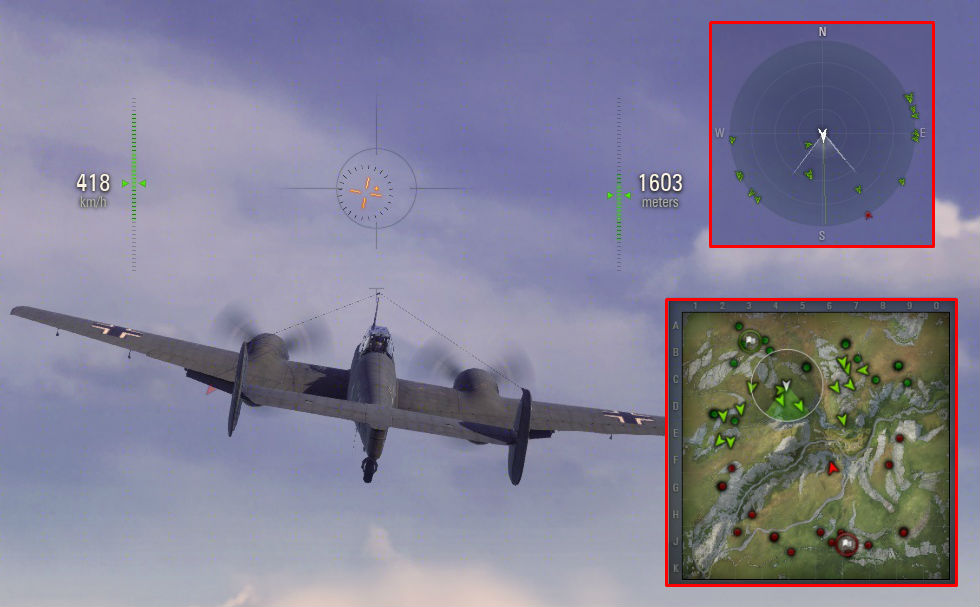
Here you can see that you have two buddies at around 600m from you who are fighting with your currently locked target at around 500m while another buddy is fleeing the scene, trying to escape a pursuer at 900m. Although the trio to your right is at the same altitude as you, the pair heading north is above you by at least 300m (top arrow much smaller in comparison to your own in the middle). |
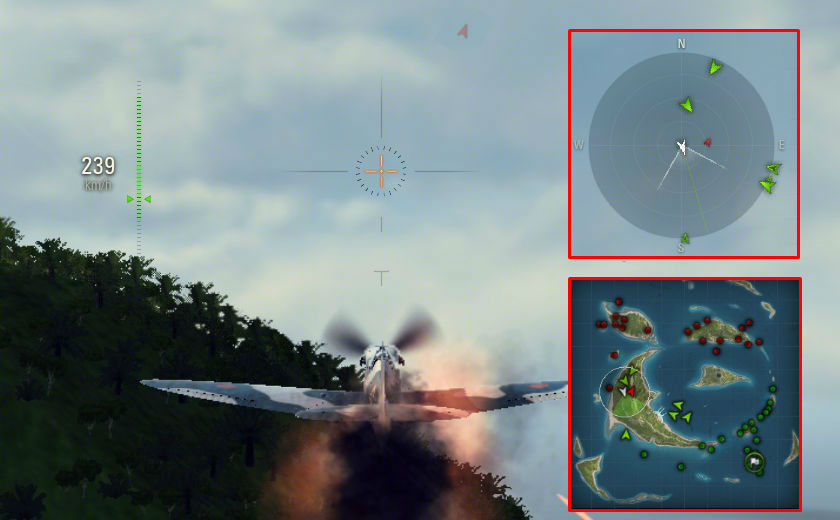
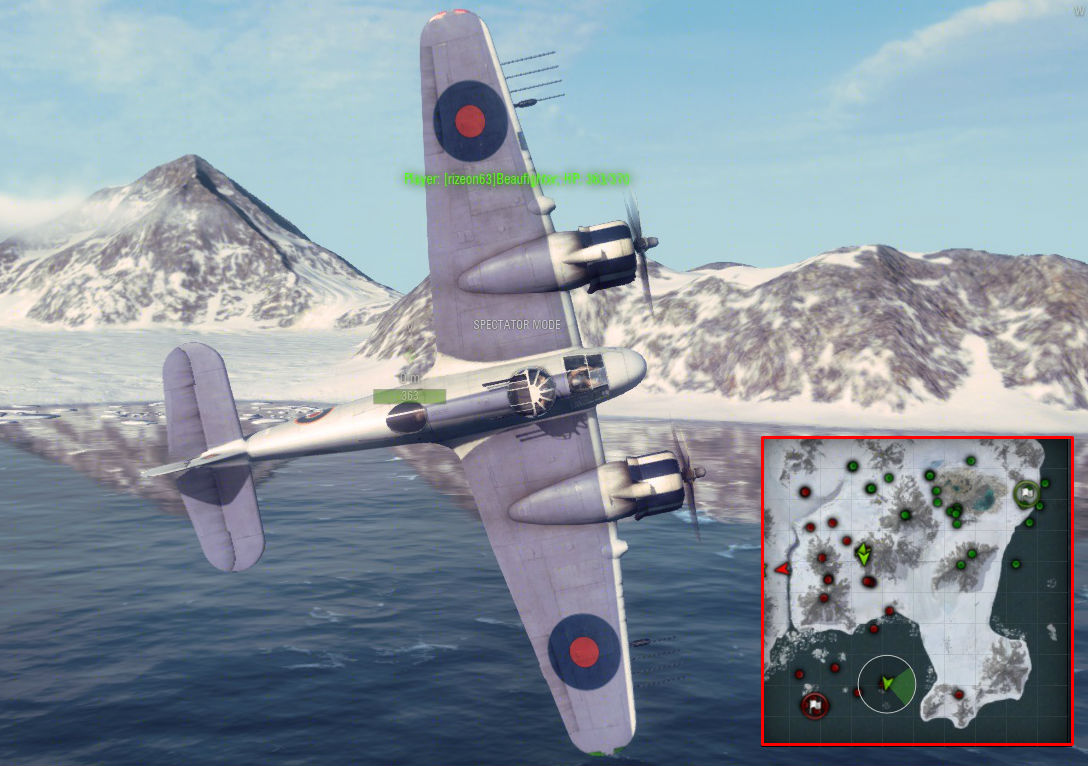
The radar can even come in handy when attacking ground targets. The white circle around your plane on the minimap corresponds to the radius of your radar (1km). Use this information to know when to turn your plane around for another run at your currently selected ground target. Here the Beaufighter turns around as soon as the ship that it's attacking reaches the outer line of the radar radius. When it turns around, it will have enough space to finish off the target without the need for another turn. |
||
Lastly, don't forget that by pressing the Alt key (on default controls), you can also show the class of all visible planes, not only on the minimap but also on the radar. Use this information to adjust your strategy and decide your next course of action.
| Click to enlarge! | ||
 |
 |
|
| As long as you hold down the button for the command 'Show players' (Alt by default), the game will show not only all visible players' names and their distance, but also the class of their aircraft. Here you can see that you're in the company of two other heavy fighters as you head into a group of at least four enemy planes, of which two are ground attack aircraft and two are their escort fighters. | Now that you've dealt with the escort, you can see that the two ground attack aircraft have slipped by. Use what you have learned to deduce that they are around 1.5km away, by simply glancing at the radar whilst hitting the 'Show players' button. Now you know that they're defenseless you are ready to strike! | |
With this, our look at the radar comes to a close. We hope you've learned something new and are already looking forward to the next time when we call you in to our Flight Academy.
 |
 |
 |
